Getting Started with Sentinel RMS—Standalone Lease Mode
Introduction
The purpose of this document is to is to get you started with the licensing workflow of SCL (Sentinel Cloud Licensing) Add-on for RMS. It aims to familiarize you with the following processes:
>Obtaining SDKs of the Sentinel RMS and SCL Add-on
>Provisioning licenses using the Sentinel EMS
>Consuming licenses by building and executing SCL samples for the standalone lease mode.
About the Samples
The sntl_lease_demo sample has been referenced in this document. It is a console-based sample that shows how to use Unified APIs to obtain, use (request), sync, and release a license in the standalone lease mode.
Obtaining Samples for the Standalone Lease Mode
The samples for the standalone lease mode are available with the SCL Add-on for Sentinel RMS package, which you can download from the Thales Sentinel order emails.
NOTE On placing an order for a Sentinel product, you receive two emails from Thales. The first email is referred to as the Thales Sentinel Order email and the second one as Thales Sentinel Secret Credential email. These emails contain order details, software download links, support details, and other important information.
Scope
>The scope of this document is limited to the following:
•License Deployment Mode: Standalone lease mode
•Operating System: Windows
•Programming Language: C, .NET, Java
>This document provides a high-level guidance for running the sample application for the standalone lease mode on Windows. The information given in this document is not comprehensive; for complete information, see the Sentinel Software and Services Solutions Guide, EMS guides, plus other referenced documentation.
Prerequisites
This section contains information on what is required for running the sample.
>Software SDK Requirements: You must meet the software and hardware requirements for installing the following SDKs:
•Sentinel RMS SDK: For details, refer to the section “Installation Information” in the Sentinel RMS SDK Release Notes.
•Sentinel Cloud Plugin (SCP): The SCP SDK is available within the SCL Add-on for Sentinel RMS package. The prerequisites for installing SCP are same as for Sentinel RMS SDK.
>Compiler: For compiling the sample application on Windows (32-bit and 64-bit), you need to install Microsoft Visual Studio (any version from 2008 to 2017). We have used Microsoft Visual Studio 2008 to explain the procedures in this document.
Running a Sample Application on Windows
The following are the basic steps for running a SCP-enabled RMS sample application on Windows:
1.Download RMS and SCL Add-on Package
2.Provision Licenses using EMS
Download RMS and SCL Add-on Package
The first step is to download the Sentinel RMS SDK and SCL Add-on zip package from the Sentinel order emails, and install the Sentinel RMS SDK.
To download and install the Sentinel RMS SDK:
1.Open the Thales Sentinel Order email. In the Download Details table, click the Download link corresponding to the Sentinel RMS SDK (Windows) field.
2.For trial licenses, clicking the link will directly start the SDK download. For all other licenses, you are redirected to the Thales Support Portal.
3.Extract RMSSDK9.xWindows.zip downloaded in the step above.
4.Run the self-extracting StartHere.exe file and follow the instructions provided with the graphical installation wizard. Note the following:
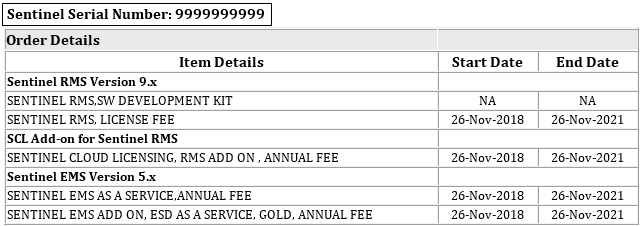
•One of the screens displayed during the installation is Customer Information dialog box. In this dialog box, type your name, organization name, and the Sentinel Serial Number. You can copy and paste the Sentinel Serial Number from the Thales Sentinel Order email. This serial number is unique for each customer.
•The default Sentinel RMS installation directory is: C:\Program Files (x86)\Thales\Sentinel RMS Development Kit\9.x\
To download the SCL Add-on for Sentinel RMS Package:
1.Open the Thales Sentinel Order email. In the Download Details table, click the Download link corresponding to the Sentinel Cloud Add-On Package field. This redirects you to a download page on the Thales support portal.
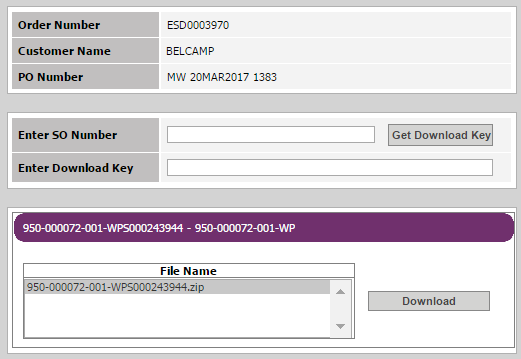
2.Enter the Sales Order (SO) number in the Enter SO Number field. The SO number is available in the subject field of the Thales Sentinel Order email.
3.Click Get Download Key. You will receive an email with the download key on your registered email address. The download key is valid for 24 hours.
4.In the Enter Download Key field, specify the received download key, and click Download. This will start the download of the SCL Add-on for Sentinel RMS package, which is a password-protected archive containing separate packages for different operating systems.
Provision Licenses using EMS
The process of provisioning licenses by using EMS is further divided into the following steps:
Launch EMS
1.Open the Thales Sentinel Order email. In the Configuration Details and URLs table, click the link corresponding to the Sentinel EMS - Non-Production Environment field. The EMS Login page is displayed.
NOTE Do not use the Sentinel EMS - Production Environment link, if present in the email, as it is meant only for the production level use.
2.Open the Thales Sentinel Order Secret email, and copy the password given for EMS.
3.On the EMS Login page, enter the password that you copied in the step above. Note that the user name is admin by default. It is recommended that you change your password after the first login.
4.Click Login. On the first login to Sentinel EMS, the getting started page is displayed which provides links to quick start with EMS. For existing users, the Entitlements page is displayed.
Define the Product Catalog
You can create a product catalog by using the Catalog menu from EMS main menu.
2.Customize the Flexible License Model
Create a Namespace
1.From the navigation pane, select Catalog > Namespaces to open the Namespaces page.
2.Click Add Namespace. The Add Namespace page is displayed.
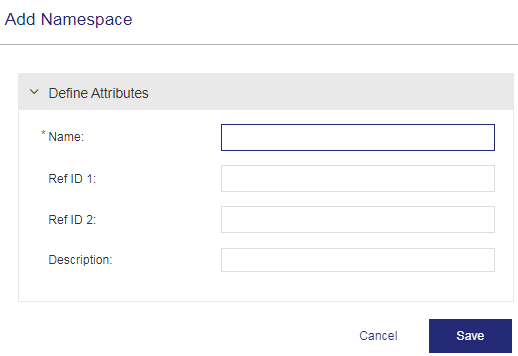
3.In the Name field, type SampleStandalone.
4.Click Save.
Customize the Flexible License Model
1.From the navigation pane, select Catalog > License Models to open the License Models page.
2.Search by Name for the Flexible License Model.
3.Under the Actions column, click the ![]() icon. The Copy License Model page is displayed.
icon. The Copy License Model page is displayed.
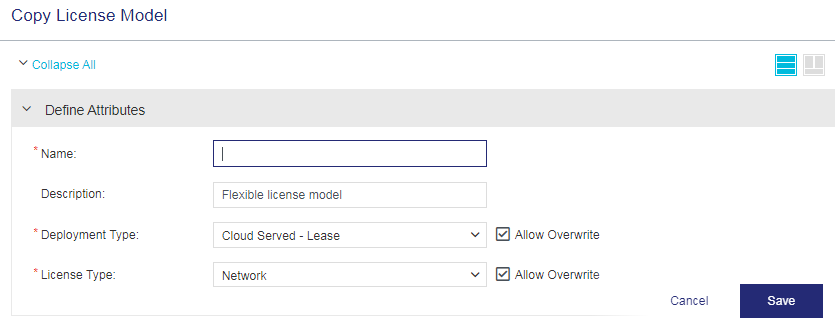
4.In the Name field, type FlexiLM_SampleStandalone.
5.From the License Type dropdown, select Standalone.
6.Under the Cloud Served section, set Fingerprint Registration to No. This specifies that the machine registration is not required to consume the entitlement.
7.Under the Policy section, set Enforce Clock Tampered to No. This disables time tampering detection.
NOTE If you want to enable the time tampering, you will need set up the persistence information on the standalone machine by using the sntlInitStandaloneSystem API. For API details, refer to the Sentinel RMS API Reference Guide.
For the C interface, you can set up the persistence information by executing the initdemo sample. This sample is available in the Samples folder of the standard RMS installation.
8.Click Save. The FlexiLM_SampleStandalone license model is created.
Create a Feature
1.From the navigation pane, select Catalog > Features. The Features page is displayed.
2.Click Add Feature. The Add Feature page is displayed.
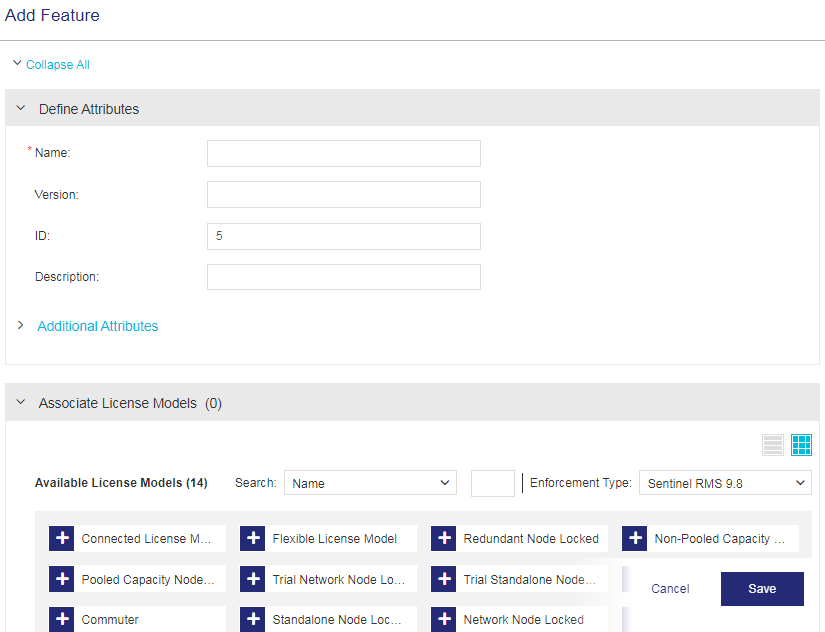
3.From the Namespace dropdown, select SampleStandalone.
4.In the Name field, type Addition.
5.In the Version field, type 1.
6.In the Available License Models pane, click the FlexiLM_SampleStandalone license model to add it to the Associated License Models list.
7.Click Save. The Addition feature is created.
Create a Product
1.From the navigation pane, select Catalog > Products. The Products page is displayed.
2.Click Add Product. The Add Product page is displayed.
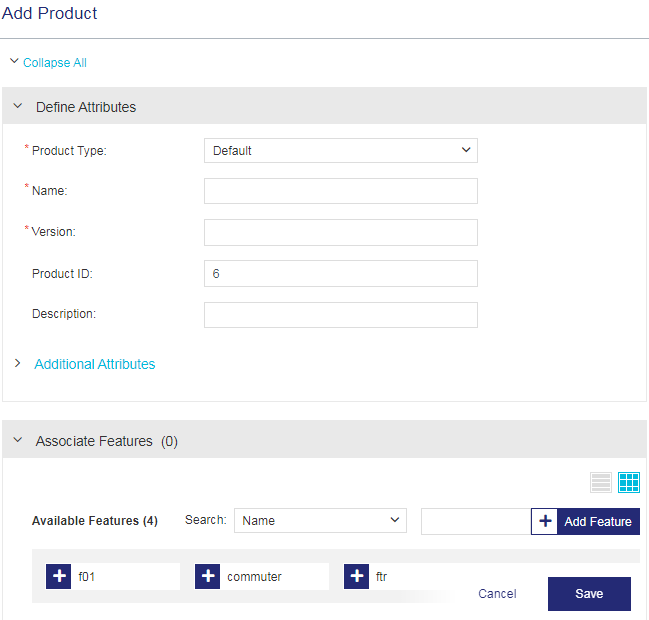
3.From the Namespace dropdown, select SampleStandalone.
4.In the Name field, type Product1.
5.In the Version field, type 1.
6.In the Available Features pane, click the Addition feature to add it to the Associated Features list.
7.Click Save. The Product1 product is created.
8.For the product you created, under the Actions column, click  . The Complete Product dialog box is displayed.
9.Click Complete. This marks the product as complete, and makes the product available for distribution.
With this step, you have successfully created a product catalog.
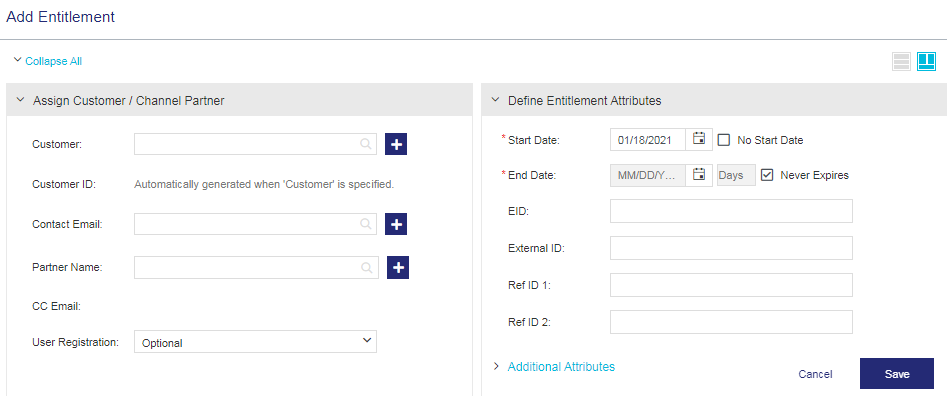
Provision an Entitlement
1.From the navigation pane, select Entitlements to view the Entitlements page.
2.Click Add Entitlement. The Add Entitlement page is displayed.
3.Next to the Customer, click  .
.
4.The Add Customer dialog box is displayed.
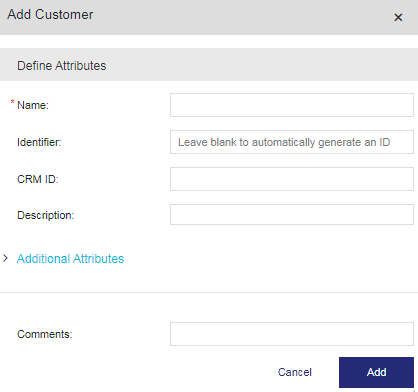
5.In the Name field, type CustStandalone.
6.In the Identifier field, type CustStandalone.
NOTE This is referred to as the customer ID. You will require this during the SCP configuration, as explained in the later part of this document.
7.Click Add.
8.Expand the Associate Products / Product Suites pane. Under the Available Products section, click the Product1 product to add it to the Associated Products / Product Suites section.
9.In the Available Quantity field, enter 10.
10.Click Save to save the entitlement in the draft state.
11.Under the Actions column, Click  to complete the entitlement. A pop-up appears to confirm if you want to proceed.
12.Click Complete. The entitlement details are saved.
13.Click OK.
The license is deployed successfully. .
Configure SCP
You need to configure SCP (downloaded earlier) to ensure that the sample application can fetch licenses from the cloud. Before configuring SCP, perform the following steps:
>Merge Sentinel RMS SDK and SCL Add-on for Sentinel RMS Package
>Modify the SCP Configuration File
Merge Sentinel RMS SDK and SCL Add-on for Sentinel RMS Package
You need to merge the contents of standard RMS SDK installation with the SCL Add-on for Sentinel RMS Package to:
> Obtain SCL samples for the standalone lease mode, and
>Setup the environment required for the execution of the samples
To merge the Sentinel RMS SDK and SCL Add-on for Sentinel RMS Package:
1.Unzip the SCL Add-on for Sentinel RMS package (zip archive) by using the password received in the Thales Sentinel Order Secret email.
2.Unzip the Windows-specific SCL Add-on for Sentinel RMS package (Sentinel Cloud Add-On Windows.zip), and copy all its sub-folders (Development, Manuals, Redistributable, and Samples).
The contents of Samples folder are shown in the next section.
3.Go to the folder where RMS SDK is installed, that is: C:\Program Files (x86)\Thales\Sentinel RMS Development Kit\9.x\.
Paste the folders copied in the step above, and confirm to merge the folders.
Contents of the Samples Folder (before the merge)
The following table describes the contents of the Samples folder inside the SCL Add-on for Sentinel RMS package (before the merge):
| Interface |
Windows \Sentinel Cloud Add-On Windows |
|---|---|
| Samples for C |
\Samples\C\ >sntl_lease_sample.MSVS2008.sln >sntlcloudp_configuration_[vendor_alias].xml \Samples\C\Src\ >sntl_lease_demo.c >sntl_lease_demo.vcproj >sntl_lease_tool.c >sntl_lease_tool.vcproj |
| Samples for Java |
\Samples\Java-Jna\ >build_lease_sample.bat >sntlcloudp_configuration_[vendor_alias].xml >sntl_lease_demo.java >sntl_lease_demo.MF >sntl_lease_tool.java >sntl_lease_tool.MF |
| Samples for C# and VB.NET | \Samples\DotNet-Unmanaged\
>sntlcloudp_configuration_[vendor_alias].xml \Samples\DotNet-Unmanaged\C#\ >sntl_lease_demo.cs >sntl_lease_demo.csproj >sntl_lease_sample.sln >sntl_lease_tool.cs >sntl_lease_tool.csproj \DotNet-Unmanaged\VB.NET\ >sntl_lease_demo.vb >sntl_lease_demo.vbproj >sntl_lease_sample.sln >sntl_lease_tool.vb >sntl_lease_tool.vbproj |
Modify the SCP Configuration File
To configure SCP, you need to modify the SCP configuration file (sntlcloudp_configuration_<Vendor_Alias>.xml), which is available in the interface-specific folder inside the Samples folder.
>For C: \Samples\C\
>For Java: \Samples\Java-Jna\
>For .NET: \Samples\DotNet-Unmanaged\
To configure SCP:
1.Navigate to the folder containing the SCP configuration file (sntlcloudp_configuration_<Vendor_Alias>.xml).
2.Double click the SCP configuration file to open it, and update the following:
a.Copy the YPS URL Dev from the Thales Sentinel Order emails and specify it in the SCP configuration file.
<YPSaddress value="https://sin01_heppq.prod.sentinelcloud.com/YPServer" />
b.Update Customer ID to CustStandalone. This is the value you specified for the customer in the step "Provision an Entitlement".
<Customer id="CustStandalone" />
c. In the FingerprintFriendlyName element, set the value to the host name of the standalone machine on which you want to request license.
Example:
<FingerprintFriendlyName value="host_name"/>
NOTE You will also need to setup the proxy configurations if you are working in a proxy environment. For details on proxy configuration, refer to the Sentinel Cloud Licensing (SCL) Add-on Installation and Configuration Guide.
Compile and Run the Sample
You need to compile the sntl_lease_demo sample to get the executable application, which can be run to consume the license.
Steps for C
To compile the sntl_lease_demo.c sample:
1.Open Microsoft Visual Studio as Administrator.
2.Open the sntl_lease_sample.MSVS2008.sln solution file in Visual Studio. This file is available in the \Samples\C\ folder.
3.(Optional) By default, the feature name is Addition and feature version is 1 in the sample source file. However, if you have created a feature in EMS by a different name and version, you can change the defaults in the sample. To do so:
a.In the Solution Explorer, navigate to the sntl_lease_demo folder, expand Source Files and double-click the sntl_lease_demo.c file to open it.
b.In the source file, change the feature name and feature version to the values defined in EMS.
4.Build the sample. To do so, right-click the sntl_lease_demo folder in the Solution Explorer, and click Build. The output is the sample application executable (.exe) in one of the following directories depending on the configuration setting (Release or Debug):
\Samples\C\Out\MSVS2008\x86\Release
\Samples\C\Out\MSVS2008\x86\Debug
Next, you need to run the sample application executable (.exe) to consume licenses. To run the sntl_lease_demo.exe file:
1.Open the command prompt as Administrator.
2.Change the directory to the output folder by running the following command:
cd C:\Program Files (x86)\Thales\Sentinel RMS Development Kit\9.x\Samples\C\Out\MSVS2008\x86\Release
3.Execute the sntl_lease_demo.exe file.
Output of the Sample
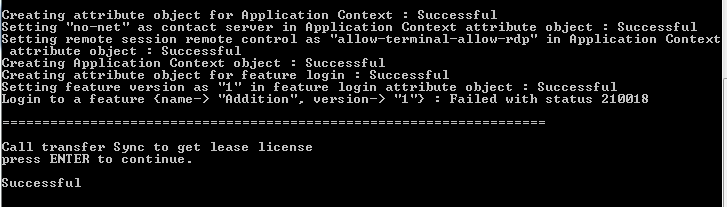
Once the sample compiles and runs, the Console window displays the execution results.
1.An application context is created, and SCP initiates the retrieval of licenses from the cloud. The login call is also executed to consume the license.
2.If the license is not fetched (error 210018) or the existing license on the machine has expired (error 214109), the sntl_licensing_transfer API with the sync action is executed to fetch the license again. In the figure below, the login API call has returned the error 210018 to indicate that the license has not been fetched.
So, press Enter to sync licenses from SCC to the machine. The “Successful” message indicates that SCP has initiated the retrieval of licenses from the cloud again.
3.Press Enter to get sync lease job information.
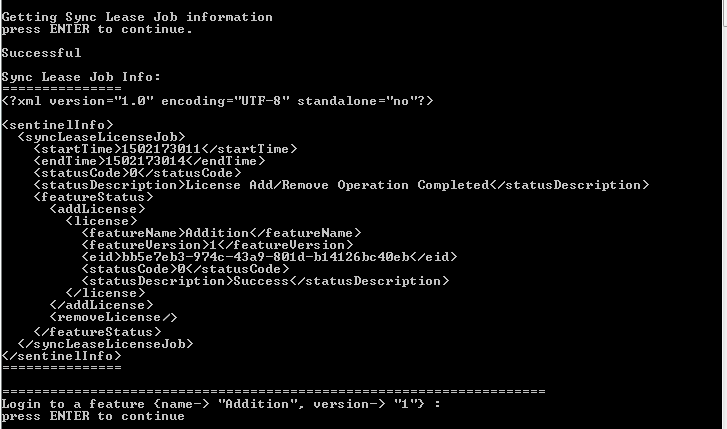
4.Press Enter to call the login API. This requests licenses for the Addition feature, as shown in the figure below:
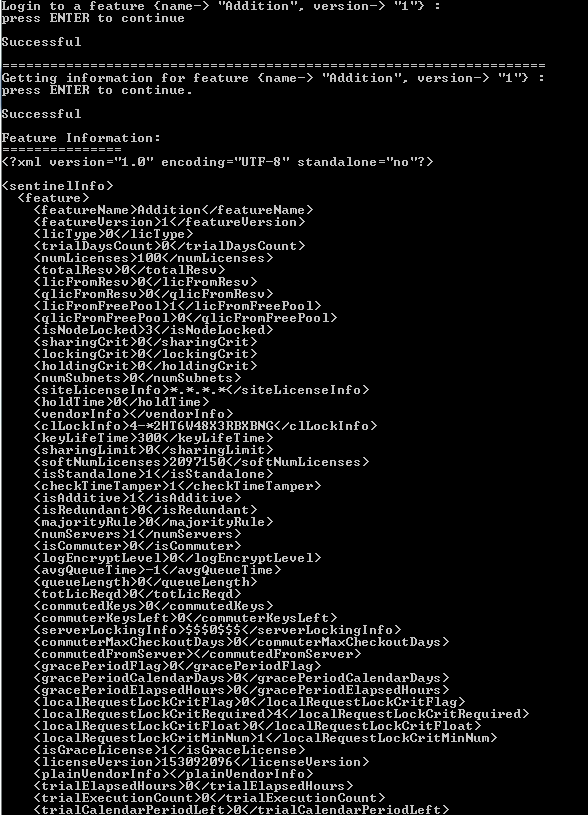
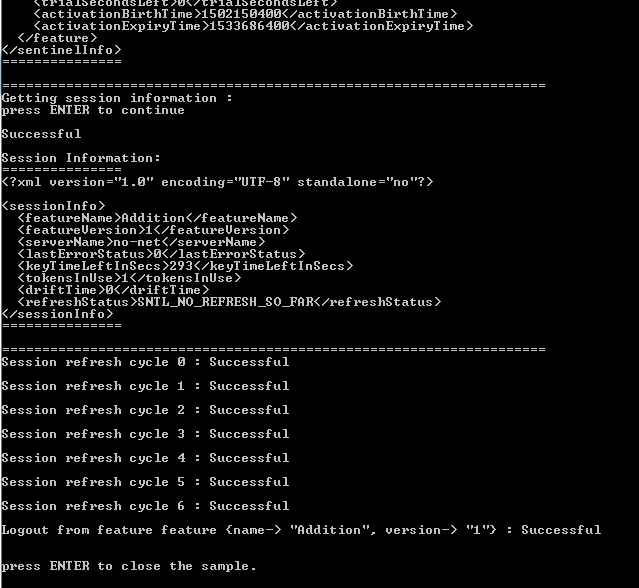
5.Press Enter. The information for the Addition feature is displayed.
6.Press Enter. The session information is displayed, which is the information for the current license session . Note that a successful license request creates a license session. For example, <tokensInUse> is shown as 1 because one license has been used with the call to the login API.
Next, the refresh API is called to periodically refresh the license and keep the license session alive for a longer period.
Afterward, the logout call is executed to release licenses.
7.Press Enter to close the sample.
Error Code
Refer to the Sentinel RMS SDK API Reference Guide for information about errors and status codes.
Steps for Java
You can compile Java samples by using batch files.
To compile and run the Java sample on Windows:
1.(Optional) By default, the feature name is Addition and feature version is 1 in the sample source file. However, if you have created a feature in EMS by a different name and version, you can change the defaults in the sample. To do so:
a.Go to the directory containing Java samples, which by default is \Samples \Java-Jna (on the RMS SDK installation).
b.Open the sntl_lease_sample.java source file in an editor of your choice.
c.In the source file, change the feature name and feature version to the values defined in EMS.
2.Open the command prompt as admin.
3.Change directory to the path where the Java samples are available.
4.Set the JDK path. Example:
SET JDK=C:\Program Files (x86)\Java\jdk1.7.0_75
5.Run the batch file.
build_lease_sample.bat
All the samples will be compiled, and corresponding class and jar files will be created.
6.Run the sample.
java -jar sntl_lease_demo.jar
Once the sample compiles and runs, the Console window opens showing the execution results.
Steps for .NET
The .NET samples are available for the following languages:
>C#
>VB.NET
1.Open Microsoft Visual Studio as Administrator.
2.Open the sntl_lease_sample.sln solution file in Visual Studio. This file is available in the following folder on the RMS SDK installation:
•For C#:
\Samples\DotNet-Unmanaged\C#
•For VB.NET:
\Samples\DotNet-Unmanaged\VB.NET
3.(Optional) By default, the feature name is Addition and feature version is 1 in the sample source file. However, if you have created a feature in EMS by a different name and version, you can change the defaults in the sample. To do so:
a.In the Solution Explorer, navigate to the sntl_lease_demo folder, expand Source Files and double-click the sntl_lease_demo file (.cs or .vb depending on the language) to open it.
b.In the source file, change the feature name and feature version to the values defined in EMS.
4.Build the sample. To do so, right-click the sntl_lease_demo folder in the Solution Explorer, and click Build. The output is the sample application executable (.exe) in one of the following directories depending on the configuration setting (Release or Debug):
•For C#:
\Samples\DotNet-Unmanaged\C#\bin\x86\Release
\Samples\DotNet-Unmanaged\C#\bin\x86\Debug
•For VB.NET:
\Samples\DotNet-Unmanaged\VB.NET\bin\x86\Release
\Samples\DotNet-Unmanaged\VB.NET\bin\x86\Debug
Next, you need to run the sntl_lease_demo.exe sample application to consume licenses. To run the sntl_lease_demo.exe file:
1.Open the command prompt as Administrator.
2.Change the directory to the output folder containing the sample application executable (.exe):
3.Execute the sample application executable (.exe) file.
Once the sample compiles and runs, the Console window opens showing the execution results.
Error Code
Refer to the Sentinel RMS API Reference Guide for information about errors and status codes.
Documentation Resources
Refer to the following online pages to access Sentinel product documentation:
>Sentinel RMS: https://docs.sentinel.thalesgroup.com/softwareandservices/rms
>Sentinel EMS: https://docs.sentinel.thalesgroup.com/softwareandservices/ems